

Content
About Inspection Template reports
List of tags <<>> that are available to use
About Inspection Template Reports
Core Inspection separates the formatting of certificates from the data contained in those certificates.
When you create an inspection template, you are creating the questions that will be asked of a technician. The formatting of the certificates is determined by a word document that is assigned to that inspection template.
If you open an existing inspection template (configuration - > Inspection Templates) and click on the "Reports" tab you should see something similar to the image below. Default Template.docx is the word document that is being used for the formatting of the certificate.
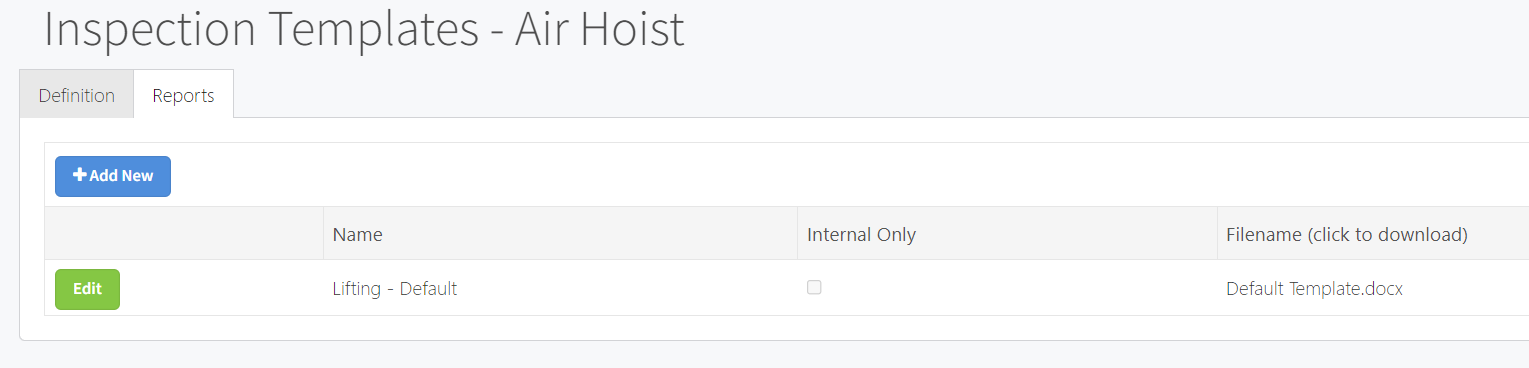
Typically you should only have one report per inspection template, however some organisations choose to add an internal report as well that may show further information that is not presented to their customers.
If you open an existing inspection template and click on the reports then click "edit", you'll see there is an option to select a default template or upload one yourself. Below are the instructions for modifying a template yourself.
To start with please either download the inspection template or download an existing one from the reports tab of an existing inspection template.
Now you can modify them according to your requirements, you can modify the header and footer and add a company logo, etc. The inspection template has to be created or modified using Microsoft Word and must follow the tag naming convention when displaying the report values.
Instructions on how to upload the inspection template report
To upload the inspection template, please sign in to the Core website.
There are two ways of uploading the inspection templates:
Selecting a Default Template
- From the menu toolbar select 'Setup' and click 'Inspection Templates' from the dropdown menu.
- From the 'Inspection Templates' page, select the desired inspection template to modify by clicking the 'Open' button.
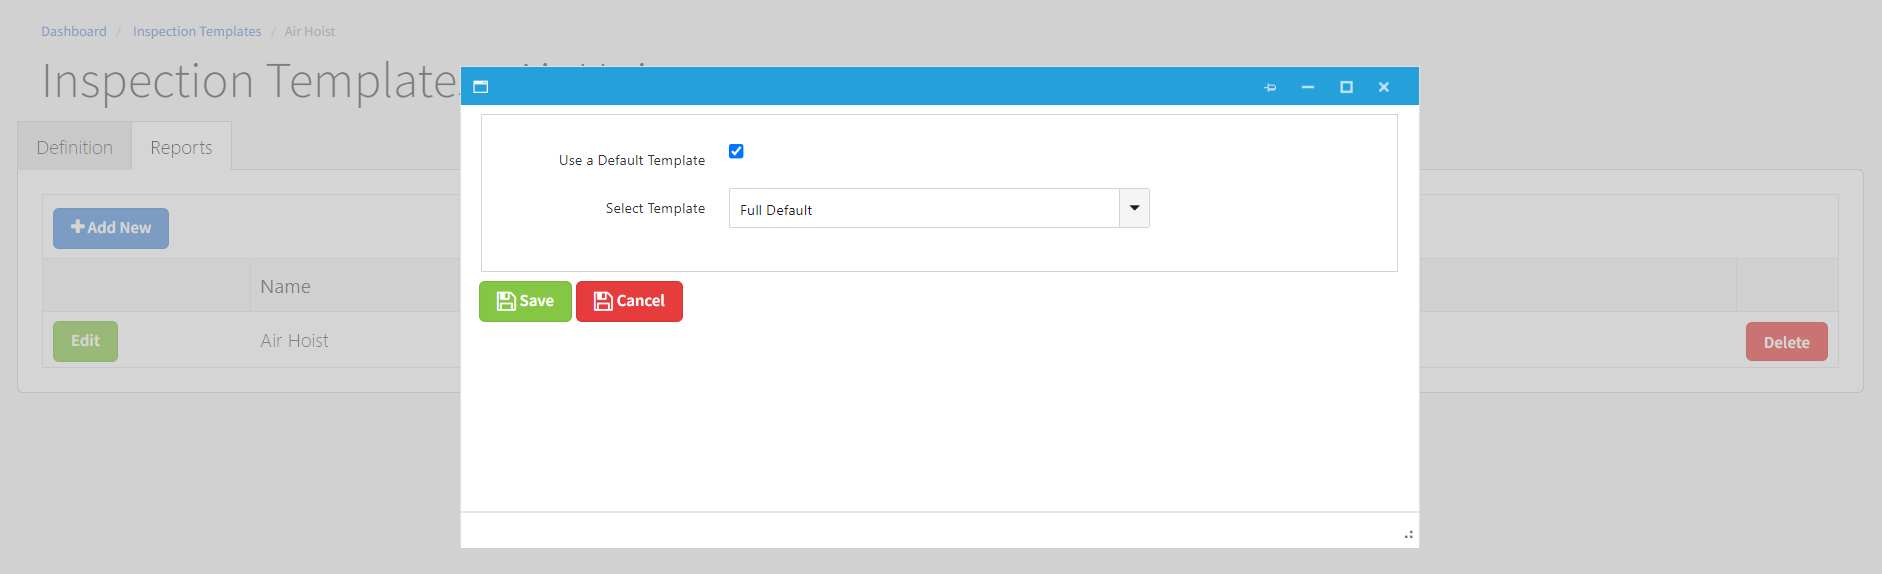
- From the 'Inspection Template' page, select 'Reports' tab -> click 'Add New' button, from the dialog box, click the 'Use a Default Template', select the desired inspection template and hit the Save button to save the changes.
Uploading an Inspection Template Individually
- From the menu toolbar select 'Setup' and click 'Inspection Templates' from the dropdown menu.
- From the 'Inspection Templates' page, select the desired inspection template to modify by clicking the 'Open' button.
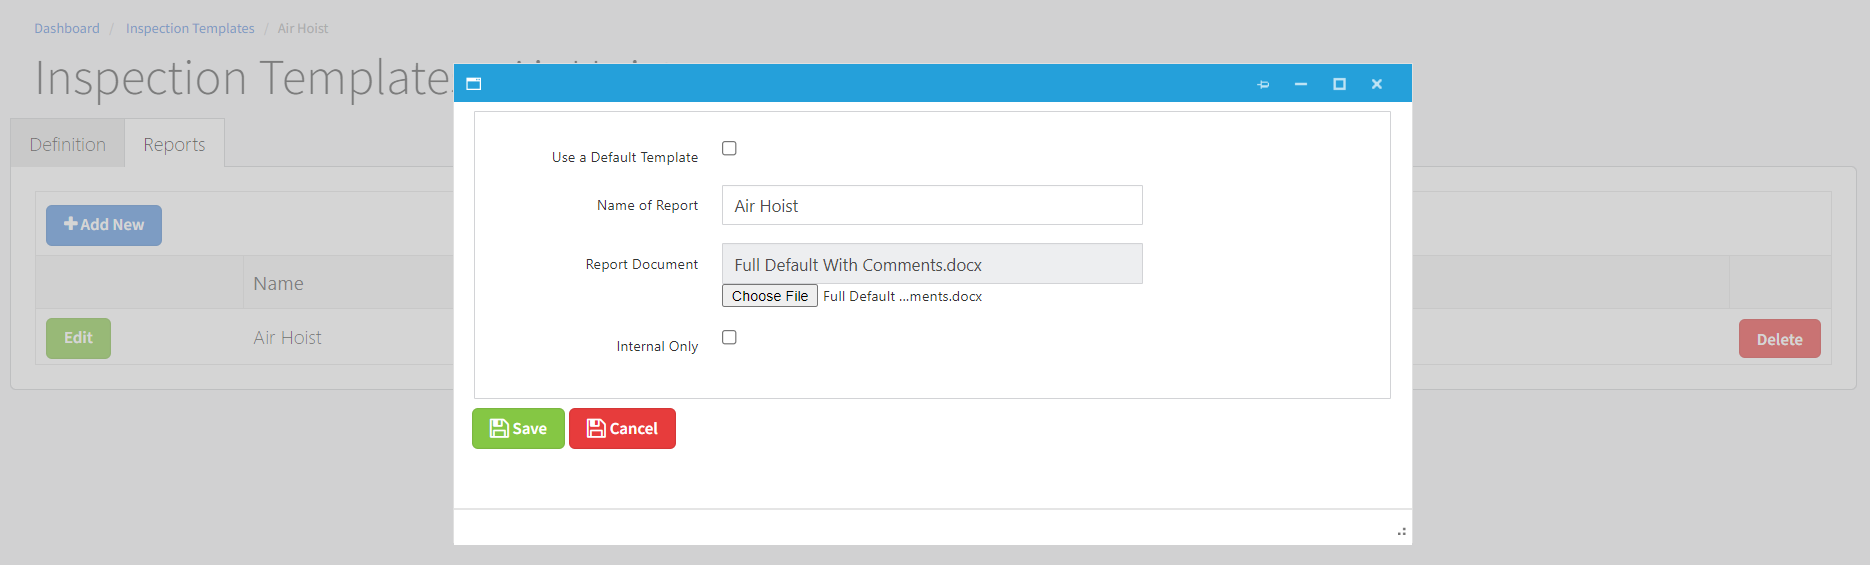
- From the 'Inspection Template' page, select 'Reports' tab --> click 'Add New' button.
- From the dialog box provide the Name of Report, leave the 'Use a Default Template' unchecked, and Upload the inspection template by clicking the 'Choose file' and hit the Save button to save the changes.
List of tags <<>> that are available to use
- Client and Client Site attributes
- Branch attributes
- Job attributes
- Job Template attributes
- Equipment attributes
- Equipment Type attributes
- Inspection attributes
- Inspector attributes
- Inspection Template attributes
Client and Client Site attributes
This information can be found on the client page.
Tag | Description |
<<Client.Name>> | Client Name |
<<Client.Name_CapitalizeEachWord>> | Use this tag to capitalise each word on the Client name |
<<Client.First Name>> | Contact First name |
<<Client.Last Name>> | Contact Last name |
<<Client.Contact Name>> | Contact Full name |
<<Client.Address>> | Client Address |
<<Client.Address.Singleline>> | Use this tag to display the Client address in a single line |
<<Client.Address.Singleline.noCountry>> | Use this tag to display the Client address without country name |
<<Client.Description>> | Client Description |
<<Client.Contact Email>> | Client Email address |
<<Client.City>> | Client City |
<<Client.Site.Name>> | Client Site name |
<<Client.Site.Address>> | Client Site address |
<<Client.Site.Address.Singleline>> | Use this tag to display the Client Site address in a single line |
<<Client.Site.Address.Singleline.noCountry>> | Use this tag to display the Client Site address without country name |
<<Client.Site.City>> | Client Site city |
<<Client.Site.Contact Email>> | Client Site reminder email |
Branch attributes
This information can be found on the branch page.
Tag | Descripton |
<<Job.Branch.Address>> | Branch Address |
<<Job.Branch>> | Branch Description |
| <<Job.Branch Logo>> | Branch Logo |
| <<Job.Branch Footer Logo>> | Footer Logo of branch |
Job attributes
This information can be found on Job details page.
Tag | Description |
<<Job.JobNumber>> | Job Number |
<<Job.Phone>> | Job Phone Number |
<<Job.Email>> | Job Email Address |
<<Job.Mobile>> | Job Mobile Number |
<<Job.Notes>> | Job Notes / Customer Requirements |
<<Job.Completed Date> | Job Completed Date |
<<Job.CustomerRef>> | Customer Reference |
<<Job.Address>> | Address |
<<Job.City>> | City |
<<Job.Contact>> | Contact Name |
<<Job.Subject>> | Job Subject |
<<Job.Location>> | Client Site Name |
<<inspection date range>> | The job may have one or more inspections. Use this tag to display the first inspection date and the last inspection date. |
<<Job.All Images>> | Use this tag to display job image attachments. |
<<Job.All Images with Serial>> | Use this tag to display job image attachments corresponding with a serial number. |
<<CurrentDate>> | Current Date |
<<Job.Workers>> | List of workers assigned on this job |
<<Job.workersAndQualifications>> | List of worker's qualifications assigned on this job |
<<Ins.Passed>> | Total number of passed items |
<<Ins.Missed>> | Total number of missed items |
<<Ins.Failed>> | Total number of failed items |
<<Ins.Date>> | Job start time |
Advanced Tags
Tag | Descripton |
<<showontrue(<<inspection.section name.Field Name>>= "true")>> <<endshowontrue>> | This will show the part of the word document between the tags when the tag specified has a value of the value specified. This tag will only work when placed in a table cell in word. |
Job Template attributes
Below are the sample Job template attributes.
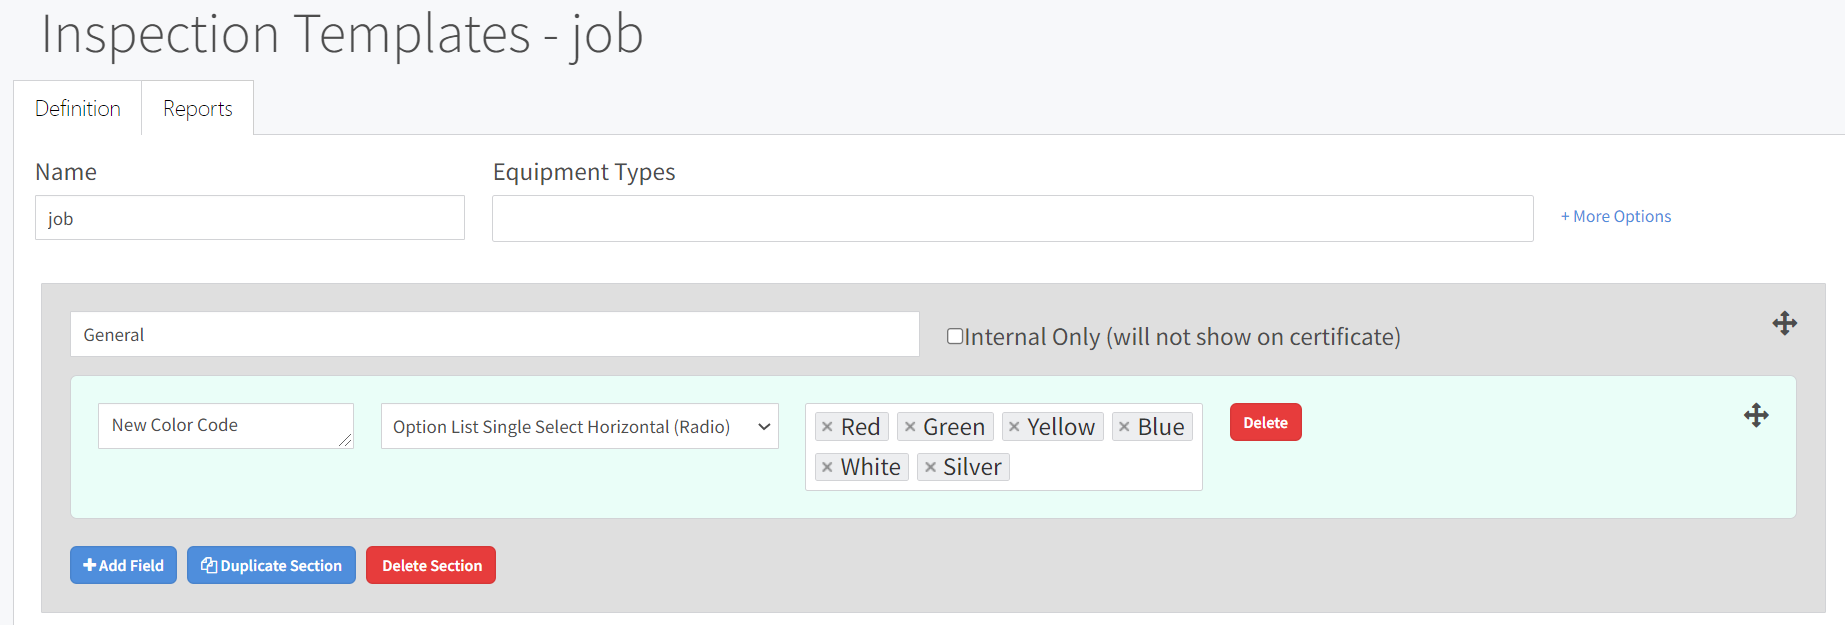
To display the job template attributes, this naming convention has to be followed.
<<Job.Attribute Name>>
For example, to display the value of 'New Color Code' on the certificate.
Start with '<<Job.' followed by Job Attribute description and ending with '.>>'.
This results to <<Job.New Color Code>> where job attribute description = 'New Color Code'.
Please take note: The job attributes tag has to be exactly the same as the job attribute description.
Equipment attributes
These information can be found on the Equipment Details page.
Tag | Description |
<<Equipment.SerialNumber>> | ID Marking |
<<Equipment.Description>> | Description |
<<Equipment.ClientReference>> | Client Reference |
<<Equipment.Location>> | Location / Location notes |
<<Equipment.Barcode>> | Barcode |
<<EquipmentType.Description>> | Equipment Type description |
Equipment Type attributes
Below are the sample Equipment Type attributes.
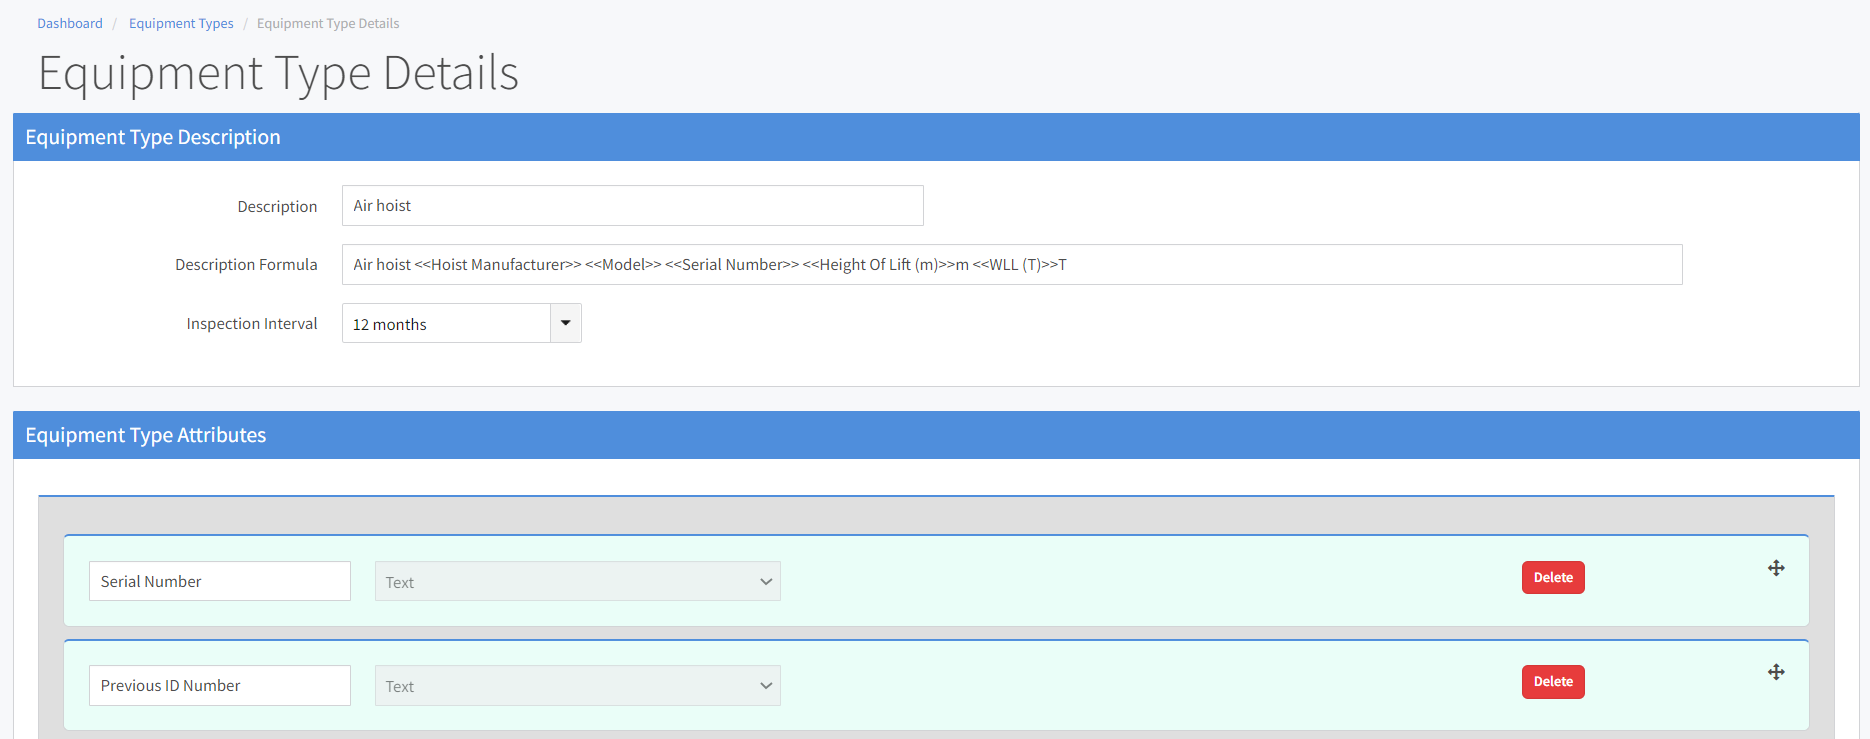
To display the Equipment Type attributes, this naming convention has to be followed.
<<Equipment.Attribute Name>>
For instance, to display the value of 'Serial Number' on the certificate.
Begins with <<Equipment. a period (.), Equipment Type Attribute description and ending with .>>.
This results to <<Equipment.Serial Number>> where equipment type attribute description = 'Serial Number'.
<<Equipment.All Attributes.Name>> tag
Use this tag to display all equipment type attributes.
- Insert a table with two columns.
- Write <<Equipment.All Attributes.Name>> tag in the first column.
- Write <<Equipment.All Attributes.Value>> tag in the second column.
Below is the sample format.
<<Equipment.All Attributes.Name>> | <<Equipment.All Attributes.Value>> |
<<Equipment.All Attributes.Table>> tag
Use this tag to display all equipment type attributes by section.
- Insert a table with four columns.
- Write the <<Equipment.AllAttributes.Table>> tag in the first row of the first column, and merge the four columns in the first row that belong to this tag.
Below is the sample format.
<<Equipment.All Attributes.Table>> | |||
Inspection attributes
Inspection attributes can be found on the Edit Inspection page
Tag | Description |
<<ins.date>> | Inspection Date |
<<ins.date.month>> | Inspection Date Month |
<<ins.date.year>> | Inspection Date Year |
<<inspectiontemplate.description>> | Inspection Template description |
<<ins.nextdate>> | Next Inspection Date |
<<ins.result>> | Inspection results possible values: Pass, Failed, or empty. |
<<ins.status>> | Inspection Status. The values are defined on the 'Predefined Comments' page. |
<<showOnPass>> | This tag should be the first text in a table cell. It will shown the table row when the inspection has passed and hide the table row when the inspection has failed. This is useful in cases where you may have some text in your certificate that only applies to a passed item. For example, "This item was found to be free of defect on the day of examination." |
<<showOnFail>> | This tag should be the first text in a table cell. It will shown the table row when the inspection has failed and hide the table row when the inspection has passed. |
<<Inspection.All Images>> | List of all images that were added as part of the attachments tab in an inspection. |
Inspector attributes
Inspector attributes can be found on the account page
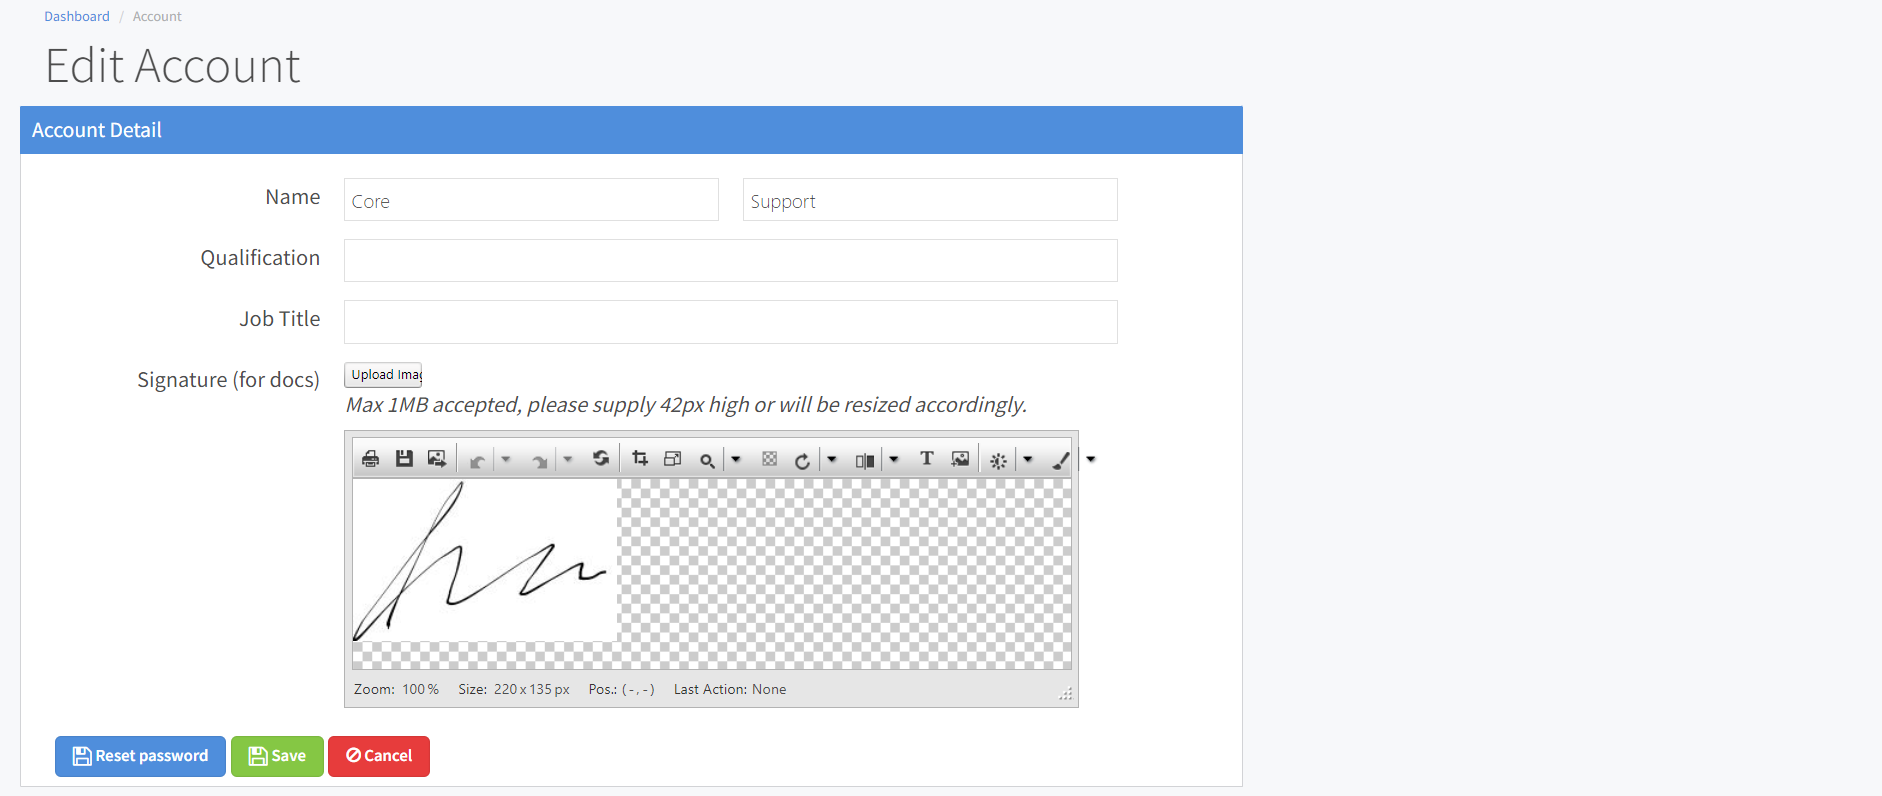
Tag | Description |
<<inspector.first name>> | Inspector First name |
<<inspector.last name>> | Inspector Last name |
<<inspector.full name>> | Inspection Full name |
<<Inspector.job title>> | Job Title |
<<Inspector.qualification>> | Inspector Qualification |
<<Inspector.Email>> | Email address |
<<Inspector.Signature>> | Inspector Signature |
Inspection Template attributes
Below are the sample Inspection template attributes.
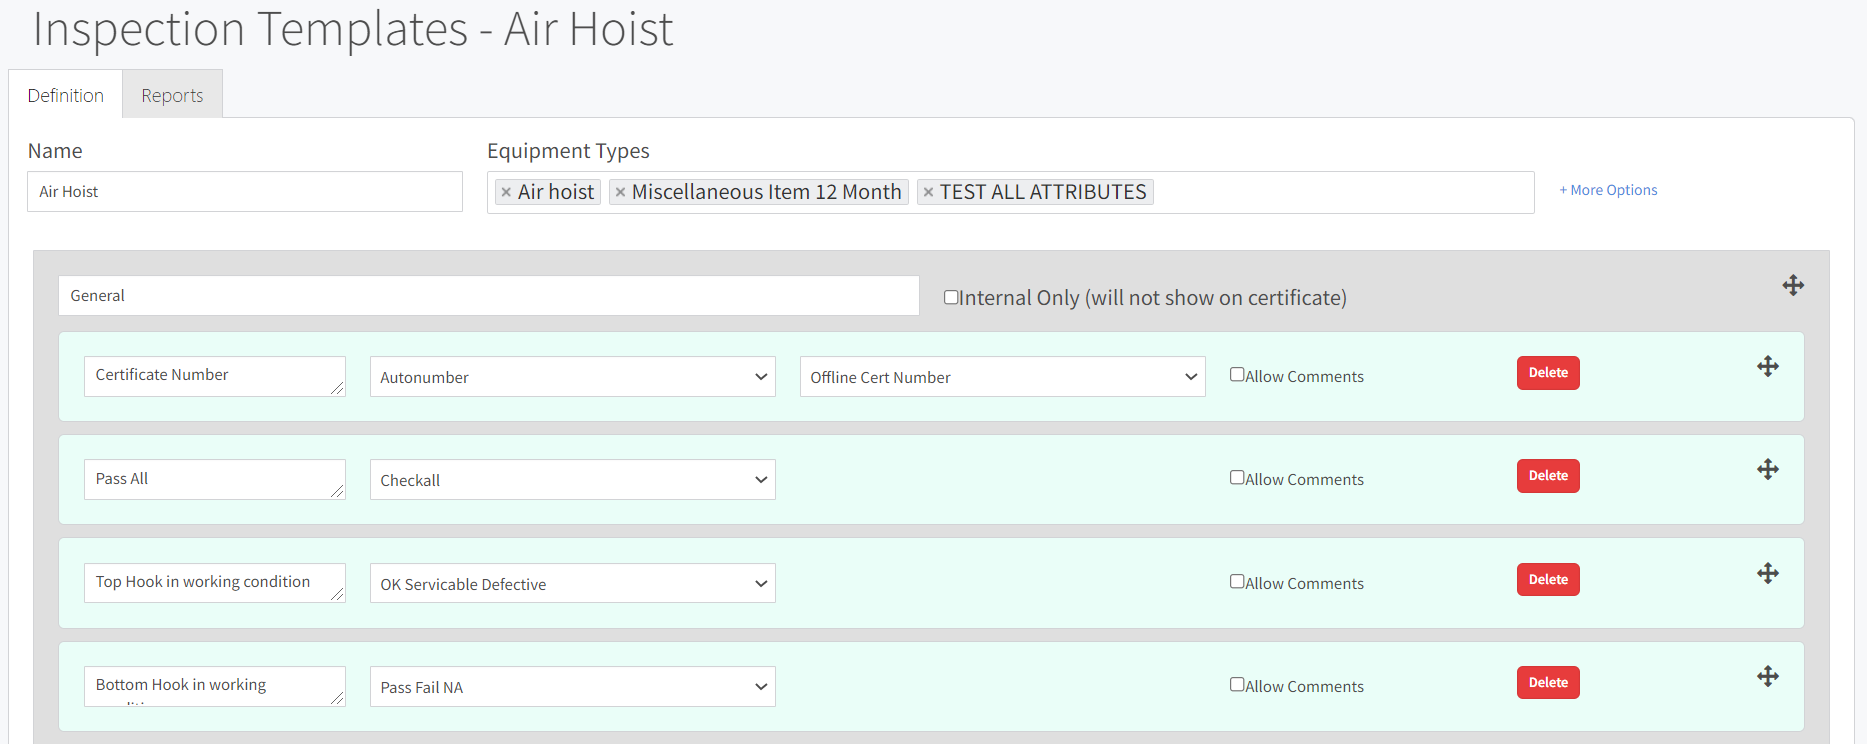
To display the inspection template attributes, this naming convention has to be followed.
<<Inspection.Section Name.Attribute Name>>
For instance, to display the value of 'Certificate Number' on the certificate.
Begins with '<<Inspection.' followed by Section Name, Inspection Attribute description and ending with .>>.
This results to <<Inspection.General.Certificate Number>> where inspection attribute description = 'Certificate Number'.
<<Inspection.All Attributes.Table>> tag
Use this tag to display all inspection template attributes.
- Insert a table with one column.
- Write <<Equipment.All Attributes.Name>> tag in the first column.
Below is the sample format.
| <<Inspection.All Attributes.Table>> |
Please take note: The inspection template attributes tag has to be exactly the same as the inspection attribute description.
<<document.document name.section.field>> tag
Use this tag to display linked inspection values of associated report fields.
Following field there is also an additional parameter ".filter=inspectiondate" allowing you to filter based on the date of the current "Inspection Date".