Overview
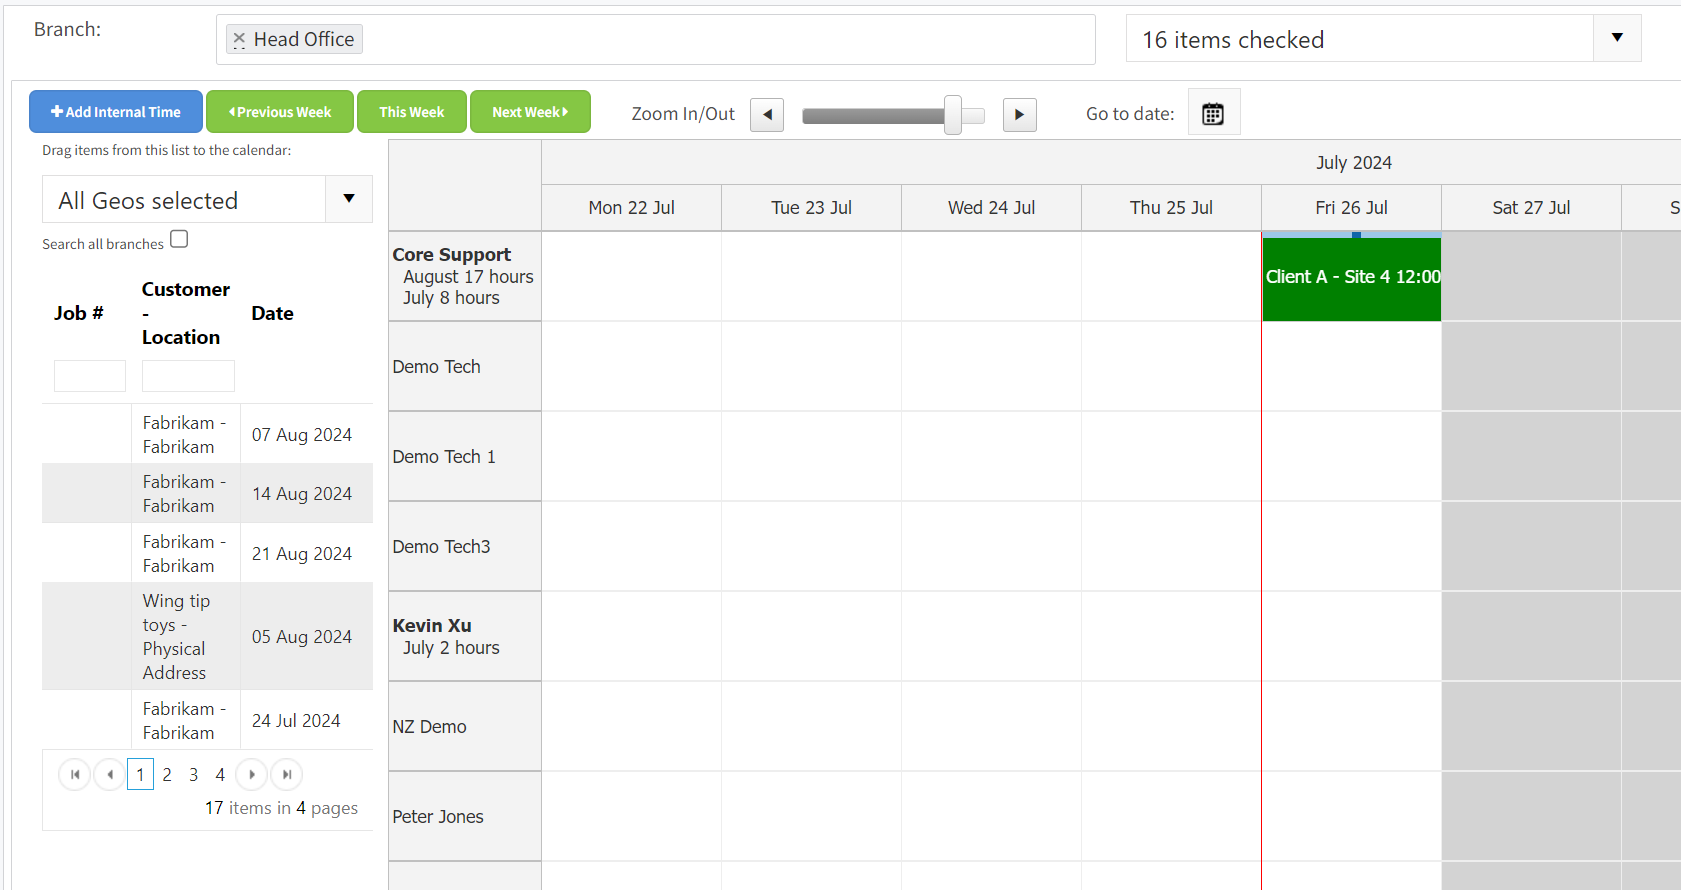
The scheduler is designed to help manage and allocate jobs efficiently. It displays a calendar view for a selected branch, allowing users to view and manage both assigned and unassigned jobs. The interface is divided into two main sections: the left-hand side for unassigned jobs and the right-hand side for assigned jobs.
Key Components
- Branch Selector: Allows you to select the branch for which you want to view or manage jobs.
- Add Internal Time Button: Use this to add internal tasks or time slots to the schedule.
- Navigation Buttons:
- Previous Week: Navigate to the previous week's schedule.
- This Week: Return to the current week's schedule.
- Next Week: Move to the next week's schedule.
- Zoom In/Out Slider: Adjust the view of the calendar for better visibility.
- Date Picker: Jump to a specific date in the calendar.
- Key: Indicates the status of jobs (Pending, Active, Complete, Approved, Overdue) with color codes.
- Technician Dropdown: Displays the technicians you want to use for scheduling.
Unassigned Jobs (Left-Hand Side)
The left-hand side of the interface lists all unassigned jobs that fall within the selected date range. These jobs can be either pending or active and can be filtered by job number, customer, location, or date.
Features:
- Search and Filter: Use the search bar and filters to find specific jobs based on job number, customer, location, or date.
- Pagination: Navigate through multiple pages of jobs using the pagination controls at the bottom.
- Drag and Drop: You can drag jobs from the left-hand side and drop them into the calendar on the right-hand side to assign them to technicians.
Assigned Jobs (Right-Hand Side)
The right-hand side displays the calendar view of the assigned jobs. Each job is represented as a colored block within the calendar, indicating its status.
Features:
- Job Interaction: Right-click on any job to bring up a context menu with various options:
- Set To Active: Change the job status to active.
- More Information: View detailed information about the job.
- View Due Equipment: Check the equipment due for the job.
- Open Job: Open the job details.
- Split Into Next Day: Split the job into multiple days if needed.
- Edit Time: Adjust the scheduled time for the job.
- Delete Time: Remove the time part from the schedule.
- Delete Job: Delete the job.
- Drag and Drop: You can drag and drop jobs between different technicians within the calendar view.
- Blue Line Indicator: The blue line within a job block indicates the part of the day the job is scheduled for, based on its start time and duration.
Repeating Job Templates
The scheduler supports repeating job templates, allowing you to create jobs that recur at set intervals. Repeating jobs are set up from the jobs page.
Setting Up a Repeating Job Template
- Navigate to Jobs Page: Go to the jobs page and select the "Repeating Job Templates" tab.
- Create Job: Click on "+ Add New" to create a new repeating job template.
- Enter Job Details: Fill in the mandatory job information, including client, client site, subject, and any other relevant details.
- Set Schedule: In the scheduling information section:
- Scheduled For: Set the start date and time for the job.
- Recurring: Choose the interval for repetition (e.g., daily, weekly, monthly, etc.).
- Example: To set up a job that repeats every three months:
- Set the "Recurring" interval to "3 months."
- Complete any additional scheduling details as needed.
- Notify Client/Technician: Choose whether to notify the client or technician about the job.
- Branch: Select the branch for which the job is applicable.
- Save Job Template: Click "Save" to create the repeating job template.
Appearance of Repeating Jobs
- Unassigned Repeating Jobs: These jobs will appear on the left-hand side as pending if they are not assigned to any technician.
- Assigned Repeating Jobs: Once assigned, these jobs will appear on the right-hand side in the calendar view.
Tips for Efficient Scheduling
- Use Filters: Utilize the search and filter options on the left-hand side to quickly locate specific jobs.
- Color Codes: Refer to the key at the top right to understand the status of jobs based on their color.
- Right-Click Menu: Make use of the right-click context menu on jobs in the calendar for quick actions.
- Repeating Jobs: Set up repeating job templates for tasks that occur regularly to save time and ensure consistency.
- Drag and Drop: Easily manage your schedule by dragging jobs from the left-hand side to the calendar or between technicians within the calendar view.
- Blue Line Indicator: Use the blue line against each record in the calendarr to quickly understand the scheduled start time and duration of each job.
This documentation should help you navigate and utilize the scheduler effectively. For further assistance, refer to the help section or contact support.